


Blog: Making Plans By: John Heisz
I have a short term schedule made up: Coming in January, I have my sharpening jig ready:
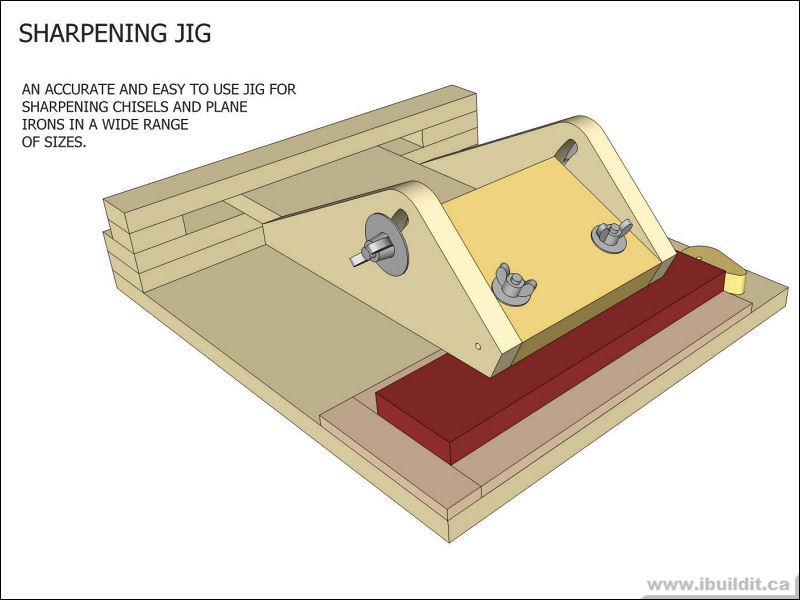
There will be plans available and an article covering the build. There will be two videos, one showing how it was made and the other goes over how to set it up and use it.
My motivation for this project was an email from a reader asking if my planer knife sharpening jig could be adapted to sharpen chisels and plane irons. I did some
experimenting on that jig, and made an adjustable tool holder for it, but found that it was too tippy – it needed more support. The idea of having a slot to guide the jig occurred to me and I made the prototype (as seen in this blog entry).
This jig is different from many of the others that are available, in that it holds the chisel or plane iron underslung, and registers the honing angle from the bottom of the chisel. This lets you set the jig up with your honing angle before the chisel is put in, and gives repeatable results, even with a different chisel. With the jig angle set, it will grind any chisel to that angle. Many of the commercially made ones register the angle from the top of the chisel, which tapers thicker toward the handle. Setting up these jigs is a matter of guesswork, and trial and error, and you’ll have to fiddle with it every time you put another chisel in.
Before starting the plans for this jig, I did some searching online to see what is available. I found the usual crude plastic and metal jigs with no real guidance system, just a roller that wears out on the stone or sheet of sandpaper. Particularly interesting was the two angle block of wood with magnets glued in, for the oh-so-low price of $31. Folks, if I could get that much for those, I’d quit everything else and start making those night and day.
The plans for this jig won’t be free, but for less than the cost of the “angle trainer” you could have the plans and enough left over for the materials to build your own.
In February, I will have a new version of my Advanced Box Joint Jig ready:
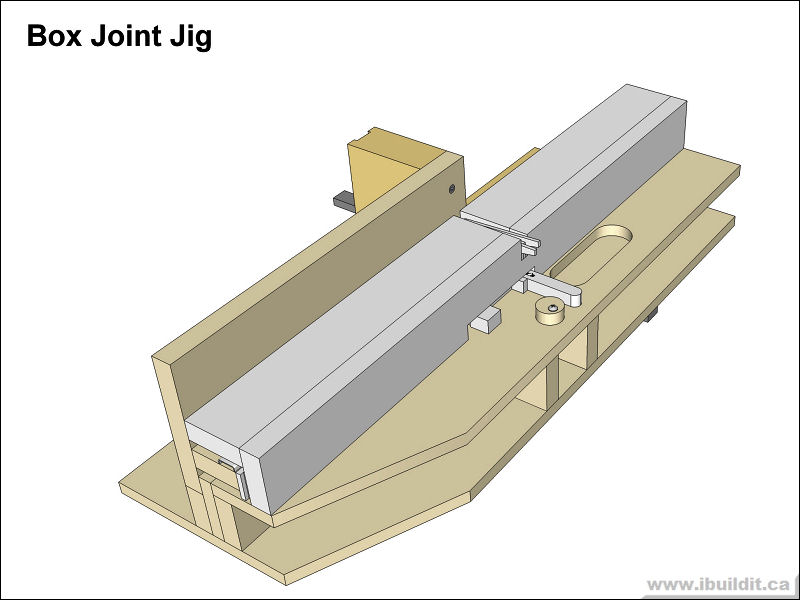
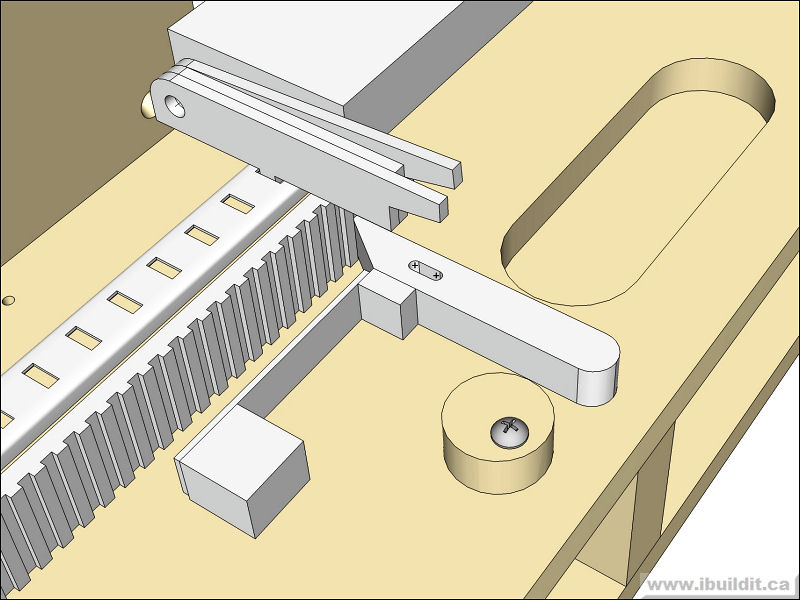
This one is bigger, and I have simplified the advance lever assembly and changed the way the carriage locks. It will use a very common piece of cabinet hardware, a metal shelf standard (pilaster), in place of the previous versions division plate. In searching for things to use for this purpose, surprisingly, I found the shelf standard to be of very high accuracy. The only issue is that the spacing is exactly 1/2″ and my jig works with 1/4″ spacing, but I came up with a work-around: the double locking blades. As shown in the picture above, when the first blade is in a slot, the other is not, and when the carriage is advanced 1/4″, the second blade now drops into the slot and the first one stays up. These will be 1/8″ thick steel or aluminum, and there is a 1/8″ spacer between.
The toothed rack that is engaged by the advance lever can be cut on the jig itself, when it is partially complete.
The rack will be made from hardwood. This should be a relief for those that shied away from the previous version because of the fear of cutting the division plate accurately.
I still have a lot of details to work out, plus a prototype to build and test. From there, I can make the plan set for the jig and use that to make one for pictures and video. If this
sounds like a lot of work, it is, but I’m fairly confident I can get it done by February.
So, what becomes of the first version? Well, for now, it stays as it is, but I may redo it to use the changes made for this one, time permitting. Even without the changes, it’s a solid design and works extremely well, and I actually prefer the division plate locking system to this newer one – the newer one is just a bit easier to make.